Wednesday, February 23, 2022

Rebuild of the 17 DOF Humanoid Robot found on eBay

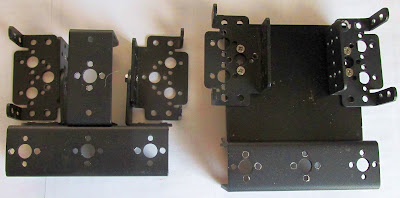
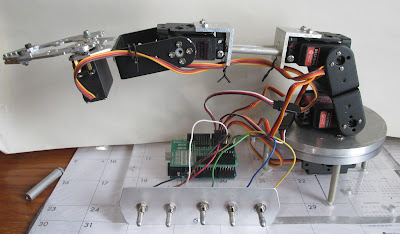
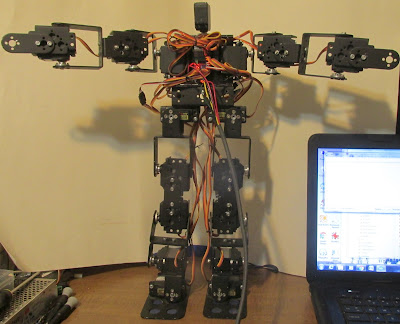
 In my book "Arduino Servo Projects" I made all kinds of Humanoid Robots.  But none of them were the 17 DOF Humanoid as is found on eBay.  I just could not get it to work.  It has a high tendency to fall over a lot.  In this guys video it fell off the table: https://www.youtube.com/watch?v=-gQDgxQkX-w !  So I spent some time trying to fix him.  One thing I noticed is that his legs are too long.  Even with the higher power MG958 servos when he falls over and I pick him up the servos then go to where they were supposed to.  The servos just cannot lift his weight!  Then as I was studying him I found the mistake!  Can you see it in the pictures below?


Here I am comparing him to the robot from RoboSoul - the HS3 (I made an imitation version and he works just like the real one)


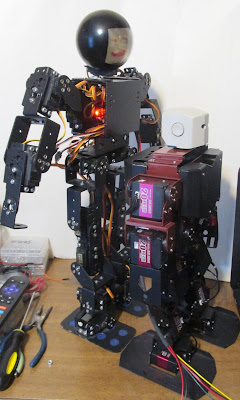
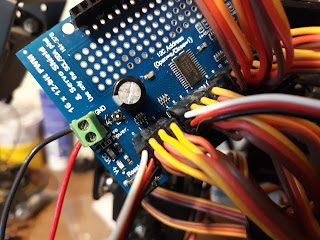
Did you find the problem?  I circled it in red in this picture.  The servo is mounted upside down!


While I was at it I also changed his chest.  The goal there was to make it more like the one that comes in the kit on eBay.  The only difference now is that his head is 3/4 of an inch taller.  I had to move the electronics to the front too.

This first picture is of the new chest bracket on the right.  It closely matches the kit on the left.  The chest is made out of a 3.5 inch piece of three inch by one inch C Channel aluminum.

This is the old chest bracket on the right.  The arms were located higher up and one inch forward of the kit design.  This gave lots of room for the electronics in the back.


I rebuilt my Arduino Servo Arm to use Switches!

This change started as an accident.  Somehow I broke one of the variable resistors that controls the servos in the arm.  So after a while I came up with the idea of using switches instead. For the switches you need 3 position ones.  The positions are on low off and on high.  Then add two 10K resistors across the switch with the two resistors meeting in the middle.  The resulting operation of the arm was much smoother and quieter.  The variable resistors picked up too much noise and that resulted in herky-jerky motion.

This first picture is of the back of the switches.  I used 33K resistors as the value is not critical.


This is the front view of the robot arm controlled by switches.

This is a video of it in operation:

Monday, February 14, 2022

15 DOF Humanoid with PCA9685 and MAX7219

There was not enough pins available on my Arduino UNO to interface a LCD.  I was using 15 pins to control the servos.  So I added a PCA9685 servo controller.  It only uses 2 pins to control 16 servos, thus freeing up many pins for further experiments.  

When I first fired up the PCA9685 shield it quickly smoked.  The polarity protection transistor could not handle the current.  So I replaced it with a jumper wire for now.  The transistor is located next to the power connector near where it says "GND".


Here is the video of the robot:

https://www.youtube.com/watch?v=u30YtSnnPJE

Here are some of the robots facial expressions:


In this picture you can almost see the fear in his eyes!


Friday, February 4, 2022

Changing the head on my 15 DOF Humanoid robot

 I am working on different options for the head or face of my 15 DOF robot.  Today I got a MAX7219 8x8 LED array working with it.  Over the years I have made heads out of Christmas ornaments and some LED's.  But they cannot change their expression.  Now I have added a MAX7219 so the robots expression can change with every command that you send him.  

This picture shows some of the robot heads I have made for my robots with the MAX7219 version in the middle.  As you can see the 8x8 LED array is a little on the small side.  I have some bigger LED arrays that are two and three color, but without the MAX7219 I do not have enough pins left over on the Arduino processor to run them.  Data TX and RX + 15 servos is 17 Pins leaving only three pins that are available to control the face.

Max7219 Humanoid Robot Head

The video is up on YouTube:

https://youtu.be/3wDNV5jnZRc