Showing posts with label Laptop repairs. Show all posts

Monday, April 29, 2019

HP Laptop Camera to USB Webcam Conversion

I have been working on hacking a Panasonic DVX100 camera.  They sell for about $100 used but they were $4000 new.  They still contain about $1000 of optics.  So I thought about using a different cameras electronics and mating it with the optics.  Then I was further sidetracked by the idea of using an old laptop camera as a USB camera.

I salvaged two laptop cameras from old laptops.  One was just 640x480 resolution but the other was 1280x960!  However the lens was glued in place making using it with the better optics not possible.  Here is a picture of the better camera.
Then, to hack the interface, the ground was metered to connect to the green wire.  Red was power and the twisted pair was the data pair.  I guessed on the twisted pair and got it right the first time.  I added heat shrink tubing later on.
Camera Green - USB Black
Camera Red - USB Red
Camera Black - USB Green
Camera Blue - USB White.

Here are the test results from https://webcamtests.com/


And finally a picture of me taken with the better camera:


Tuesday, July 25, 2017

My laptop computer died again

Sunday evening my laptop computer died again.  It was one of those HP laptops with the graphics chip that has to be resoldered with a heat gun.  This time it only lasted for a year. See: http://bobdavis321.blogspot.com/2016/08/hp-pavilion-dv9000-series-resolder-or.html

However at the Batavia Hamfest I picked up a really nice quad core laptop for $5 that needed a hard drive and a screen.  I ordered the replacement screen on eBay but the post office has sent it all over the place.
Out of desperation I hooked up a screen from a laptop that had been replaced a while back because it has a black "hole" on it.  I was amazed that a total mismatch worked!  Now to add some duct tape to hold it in place until the correct screen arrives.
The problem with the non working screen is that the LED back-light connector is burnt up.  I do not know how common that problem is or if it can be jury rigged somehow?

Here is a better picture of the fried LED back light jack with its cover removed.

I soldered wires to the cable and the LED strip still did not work so I opened it up and it is toast.  I think it overheated, perhaps like the LED back lit TV's the LED's are being pushed to the point that they short out and "China Syndrome".
The problem with the overheated LED backlight went all the way through to the motherboard!

Friday, August 5, 2016

HP Pavilion DV9000 Series Resolder or Reflow the NVidia BGA Chip

I know there are hundreds of other posts on this subject.  I have now tried it and it works!  The last time I sent the motherboard off and spent some money to fix it.  I had two sick HP DV9700 laptop's and I could not even sell them for $40 on eBay.  So with nothing to loose I thought I would give it a try myself.

You will need the following.
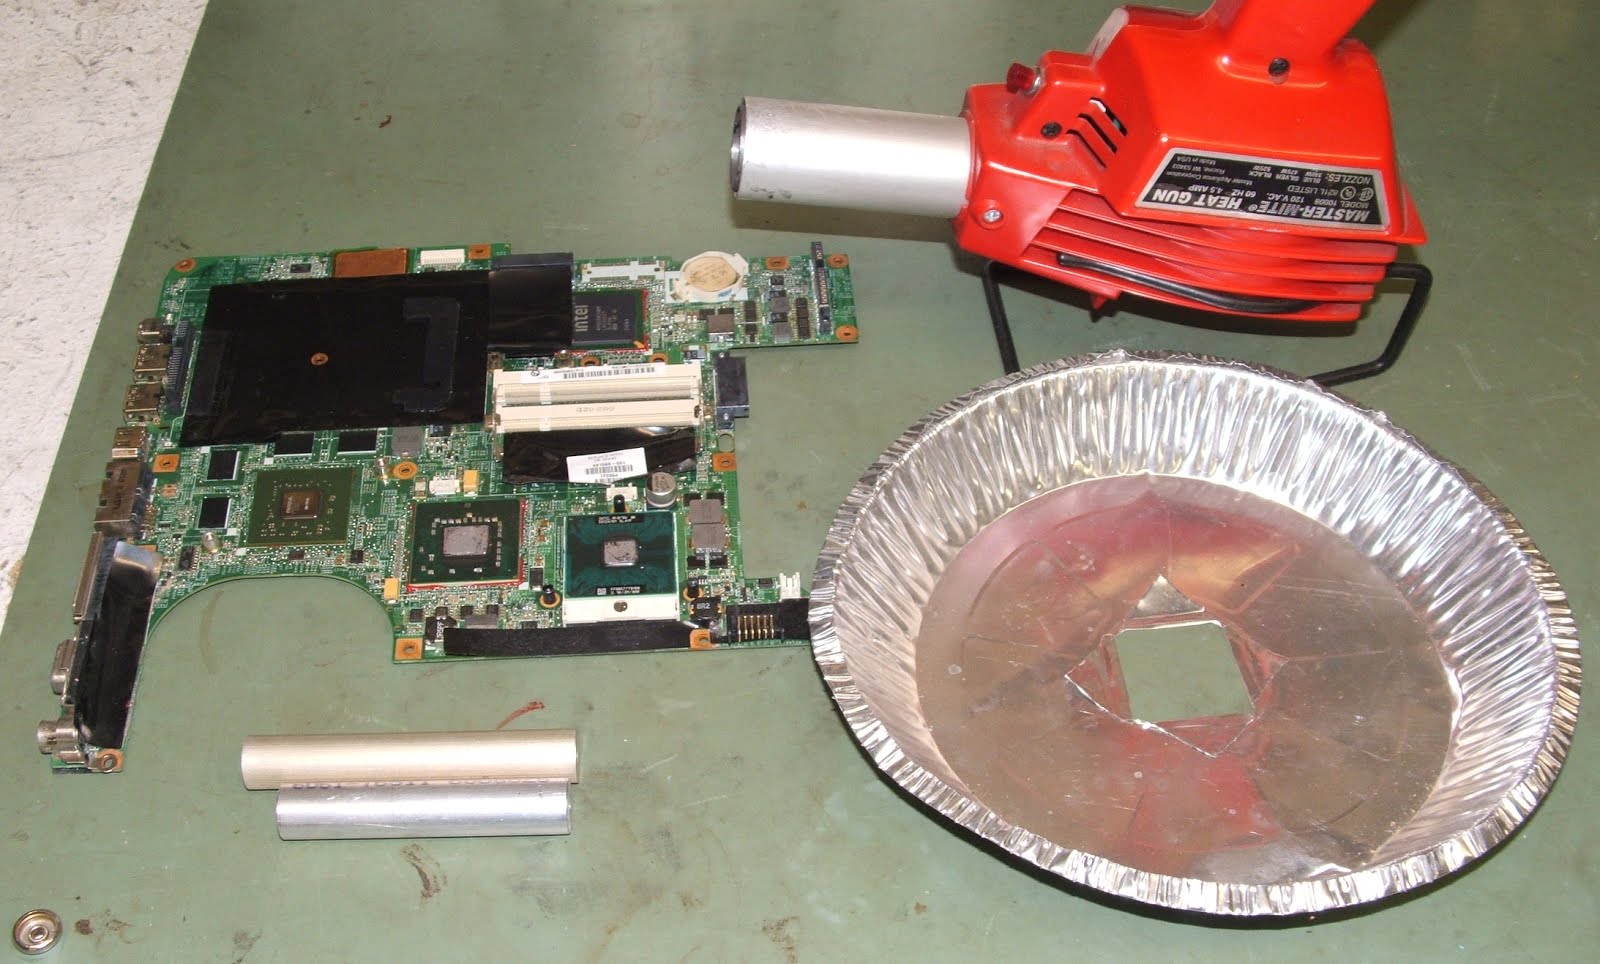
1. Spacers for under the motherboard to allow air flow underneath it.
2. An aluminum heat shield, a pie plate works
3. A heat gun capable of reaching about 450 degrees.
4. The defective motherboard.
5. A timer, a cell phone will do.


First run a time test.  Set a piece of solder on a metal surface and with the heat gun one inch away from it see how long it takes to melt the solder.  In my case it took 3 minutes.  Set the motherboard on the spacers and center the heat shield over the GPU chip.  In the picture above it is the left green chip located just above the center of the arc where the cooling fan goes.  Start the timer and hold the heat gun in place moving it slightly to heat the top of the chip evenly.  After the timer runs out let the motherboard cool slowly, like for 30 minutes before handling it or reassembling it.


Reassemble everything and hopefully you now have a working laptop!  So far this has fixed every motherboard that I have tried it on.  This fixes problems like CD ROM drive not recognized, No sound, garbage on screen, etc.

Thursday, January 9, 2014

Toshiba L645 Disassembly and fan cleaning.


I recently had a Toshiba L645 come in for a power jack replacement and a fan cleaning.  The power jack comes as a cable assembly that has to be ordered to fit the laptop.  There are some tricks to getting it apart.  There are screws in the battery compartment holding the trim that covers the screws that holds in the keyboard.  There is a screw inside of the memory compartment that holds the CD ROM drive in, and once it is removed there is a screw located above where the drive was.

1 – Remove the 12 bottom screws.
2 – Remove the 2 screws for the hard drive drawer, and remove hard drive.
3 – Remove the battery and remove 5 screws located below the battery.
            The two smaller screws hold the keyboard bezel cover in place.
4 – Remove three keyboard bezel, the screws above the keyboard, and the keyboard.
5 – Remove the seven screws under the keyboard, the right two are shorter.
6 – Remove the 3 screws and the memory cover, inside there is the CD ROM screw.
7 – Remove the CD-ROM drive and the screw hidden above it.
8 – Unscrew and/or unplug the wireless network card.
9 – Unplug the mouse, speakers and power switch, remove the top cover of the laptop.
10 – Un-tape and unplug the video cable, and the USB/VGA jack cable.
11 – Remove three motherboard screws marked with white arrows, and one fan screw.
12 – Remove motherboard with the fan assembly.
13 – Remove 4 super tiny screws and remove the fan cover to clean the fan.

As you can see in the picture the fan was fairly clogged with dust.  A small paint brush can remove the dust.  The picture quality is not that great, I was using my cell phone camera.

When I reassembled it the screen did not work.  The screen plug looked like it was plugged in but it was not inserted properly.  You might want to mark the tape that holds it in with a marker prior to unplugging it so you know if you have it back together correctly.

This picture shows the 5 screws that are located below the battery.  Two of them hold the cover that gives access to the keyboard screws.

Sunday, July 14, 2013

Gateway MS2274 Power Button Repair

I recently had a Gateway MS2274 laptop come in for repairs.  It was totally dead.  The hinges were in rough shape and some screws were missing.  The power cord had broken and was taped together in two spots.  I searched around and found another adapter but the laptop was still dead.  I started taking it apart and when I located where to power button plugs in I jumpered my screwdriver across it.  The laptop powered on and worked!  So I went on eBay and purchased a replacement.

To disassemble it there is a screw hidden on the backside of the screen hinge as well as two screws inside of the battery compartment. 

Here is the removed power switch, actually just the cord to it was bad.
Here is where the power switch is located.  You have to remove the piece above the keyboard as well as some screen screws to get to it.
 This is another picture of the power switch, it is hard to get it back together.
 Here is the screw that is hidden on the back side of the hinge. 

Tuesday, April 23, 2013

Dell Inspiron Ultrabook 14Z Hard drive removal

Recently I had the fun of removing the hard drive from a Dell Inspiron Ultrabook 14Z.  The hard drive is located under the battery.  Where is the battery you may ask??

First you need to remove the memory cover and the memory modules.  Under one of the memory modules is a hidden screw.  With that screw removed you can remove the keyboard by pushing up on the three clips at the top of the keyboard.

Once the memory cover is removed the CD ROM is free to be removed as well.  There is one screw above the CD ROM that has to be removed. 


There are seven screws under plastic covers underneath the laptop and four screws under the keyboard that need to be removed.  Three are near the front edge and one is near the CPU fan as seen in the picture below.

Next release the four ribbon cables.  Then the top cover comes off by releasing catches all around the edges.  Now you can see the battery.  There are two screws holding the battery in.  The hard drive is then reachable.

Wednesday, March 27, 2013

Dell Inspiron 1501 1505 Hinge and LCD Bracket repair

I have become a fan of the Dell Inspiron 1501 and 1503 laptops. I first fixed up one for a friend. Then someone gave me one for free. I cleaned out the cooling fan and replaced the keyboard and now it is my main computer. Recently I purchased two Dell E1505 laptops for $40 each. Their hinges were completely broken and one of the screens was even damaged because of the hinge problem. You can buy a hinge/LCD bracket assembly on eBay, or you can fix it yourself.

To fix it yourself remove the rubber stops and the screws that are located behind them. Remove the front bezel. Optionally remove the plastic over that is at the top of the keyboard to expose the bottoms of the hinges. Remove the broken hinge mounts, you should now see what is in the picture below.

To modify it first use a 1/4 inch drill bit to remove any burs on the three holes that are behind each hinge mounting bracket, so that the bracket will now fit flush against the aluminum behind it. Then use a 5/64 inch drill bit to drill the top hole in the bracket right through the back cover. Next, from the back side, drill a 3/32 inch hole through the cover and the aluminum, but NOT into the hinge bracket. Next put a screw into the new hole and thread it into the hinge mounting bracket. Before tightening that screw, you can optionally put a drop of glue or epoxy behind the bracket and then quickly tighten the screw.


If everything goes well the bracket is now glued and screwed back into place. Do not use extra super glue, the fumes off it can glue everything together and even melt plastic nearby. A tiny drop is all that is needed. I have done this repair without using any glue and it works fine.

While you are in there be sure to take out the cooling fan and clean off the heat exchanger!

Tuesday, January 15, 2013

Acer Aspire 5560 repair

My brother sent me a dead Acer Aspire 5560 laptop.  I checked the power adapter and it had 19 volts.  I tried another adapter just in case, but it did not help either.  However after hearing that the problem is usually the AC adapter I bought another one on eBay and it fixed the laptop!

However the cooling fan in this laptop did need cleaning after only one year of use.  There is one trick in dissembling it.  Remove the CD rom drive, and reach inside to find a hole to push up on the keyboard.  Then push in the 4 catches located at the top of the keyboard.


This is the back side of the motherboard. You can see the three screws that hold the cooling fan together. Remove them and clean out the fan.

Monday, October 29, 2012

Compaq F700 repair

Recently I had the job of fixing a Compaq F700 that overheated and shut off after about 15 minutes of operation.  Needless to say the cooling fan was completely clogged with dust as can be seen in the picture below.

To get inside of this computer you need to find some hidden screws.  First you remove the panel above the keyboard, then the keyboard then the CD ROM drive.  There are three screws hidden above the CD ROM front edge.  Then there are three screws you must remove from the bottom, two are standoffs and one is above the hard drive.  I circled their locations in the picture below. 


There is another screw that can only be reached from above, once the CD ROM is removed.  There is a hole now available that goes down through where the CD drive had been to access a hidden screw down below.  You have to remove the screen and all the usual screws to finally get the top cover off the laptop.  Once you remove the main board the cooling fan screws are hidden under some black sticky plastic.  They are extra small and hard to remove.

Tuesday, January 3, 2012

Targus Universal Charger Repair

Recently I fixed a Targus Universal Charger. This is the second time I have worked on one of these. If only I could remember what the problem was the last time, I could save myself lots of work. The symptoms are that there is no power at the output jack, and changing the jack does not fix the problem.

First I checked the power cable and it had power on the yellow main conductor to the shield. So it had to be the jack right? As you can see in the picture I tore the jack all to pieces to no avail. The actual problem is that the interchangeable jacks are ALL bad!  They have to be broken apart and then re-solder the center connector to the circuit board.  You might want to re-solder the grounds too while you are in there.

I swapped the rebuilt jack to the AC adapter end in the picture.

The connection color code from the end with a metal plate is:
Red
White
Yellow-Power
Ground-Sield
Blue

Saturday, November 19, 2011

HP DV9700 Repair

Once again this is another laptop that has cooling fan or clogged heat-sink problems.  I wish they would make this problem easier to fix!  If it has been run with a clogged fan then the chips in the graphics card might be permanently damaged.  If this is the case then you can send the motherboard to someone on EBay who will fix it for $75 to $100.


To fix this laptop you will have to remove over 50 screws to get to the clogged heat-sink. Start with removing 6 screws under the battery and then remove the silver cover that is above the keyboard.  Next remove 3 screws and remove the keyboard.  Next remove 6 screws (2 are underneath) , then unplug and remove the screen. The three wires to the wireless network card have to be unplugged form the card down below and then routed back out of the laptop.  Next remove 2 screws and remove the speaker assembly.  Next remove many many screws located both above and below the laptop and then remove the the top bezel. You will need to remove the wireless adapter and both hard drives as there are 4 screws that are located under the hard drives.  Then remove the CD ROM drive and its adapter.  Remove the PCMCIA card and its adapter.  Remove three motherboard screws and the 3 heat-sink/fan screws then you can remove the motherboard.  Flip over the motherboard and remove 4 screws to remove the fan and then you can clean the heat-sink.


Warning, the power connector from the power jack to the motherboard can be easily inserted incorrectly.  Make note of its orientation before disconnecting it!

Wednesday, November 16, 2011

Dell Inspiron 1501 repair

Recently I was given a Dell Latitude 1501 that was "Virus-ed to death". After reformatting the hard drive and reinstalling Windows there were other issues that I needed to fix. The mouse pad did not work because water had been spilled into it and the computer ran "hot". So I opened it up to replace the mouse pad and while inside the computer I discovered why the computer ran so hot.  Look at the heat exchanger in the back left corner in the picture below.


A trick in opening it up is that two screws that hold the LCD screen on are hidden behind small round covers on the back of the computer.  Other than that it opens up fairly easily.

Sunday, November 6, 2011

Asus EEE CMOS Battery Replacement

Recently I had the fun of replacing the CMOS Battery in an Asus EEE laptop.  The old battery was a lot smaller than the new one.  I drew a circle around the old CMOS battery so you can locate it.


The new one is bigger than the old one but there is room for it in front of where the old one was located.  Totally disassembling of the laptop is not needed.  For more instructions here is my old post on the subject: http://bobdavis321.blogspot.com/2010/12/asus-ee-disasembly.html


By the way I purchased the New CMOS battery for $3 on Ebay but now I cannot find one for less than $5?

Tuesday, May 3, 2011

Gateway W350 over heating and turning off

As you may already know I maintain a few gateway W350's. This one was shutting down every few minutes and running very hot.

Underneath the laptop there is a big cover that comes off with just one screw. Under there there is a cooling fan that comes apart by removing 4 tiny screws. Once the fan is dissembled you might see something like this:

Needless to say cleaning out the heat sink fixed the problem.......

Tuesday, April 19, 2011

Western Digital WD2500BEVS laptop 250 gig hard drives are dying!

Western Digital WD2500BEVS laptop 250 Gig hard drives are dying like crazy.  I have had to replace 2 of them in the last week.  They are mostly found in Gateway W350 Laptops.  I have switched to Seagate hard drives my self.

I then decided to warn a Gateway laptop owner of the problem and he advised me that he had to replace his hard drive 3 times!  Hopefully it is under warranty because they die when they are exactly three years old.


Speaking of Seagate they just bought out Samsung's hard drives.  That with Western Digital's acquisition of Hitachi really narrows down the manufacturers of hard drives.  maybe they see the handwriting on the wall. Solid state hard drives are taking over, no moving parts!  However solid state hard drives are still too expensive for me!

Friday, February 11, 2011

Dell Latitude D610 repair

I bought a used Dell D610 laptop a year ago and really like it. Since then I have purchased over 6 of them. Recently one of them started overheating and shutting down. Normally these laptops are a lot of work to get apart, but I figured out a quick 5 minute repair for this problem.

First remove the top cover plate by prying up on the right side and rocking it back and forth to disconnect it.


Next remove the 2 screws that hold down the keyboard. To remove the keyboard unhook the catch that is on each side of it then unplug it from the motherboard.  The second screw is above the F4 key.


Next locate the screws that hold down the processor heat sink and loosen them. They stay attached to the heat sink.


When you remove the heat sink you should be able to see if it is clogged with dust like this one. Remove the dust and then put everything back together.


Be sure to check to see if the cooling fan runs on start up. It usually shuts off until it gets hot then it turns back on again automatically.

Tuesday, January 11, 2011

Targus PA248UI laptop cooler repair.

My daughters Targus PA248UI  laptop cooler stopped working. The problem was that the AC adapter jack had become completely unsoldered.  Click on the picture and you can see that all three pins are no longer soldered in.

The secret to getting it apart is to remove the 8 screws that are located under the rubber bumpers.

Tuesday, December 21, 2010

Asus EEE disassembly / teardown / crack open

How to disassemble the Asus EEE.

To start with remove the battery and find the four catches located under the battery. Unlock them and they should stay that way so you can remove the keyboard. Under the keyboard are about 6 screws. On the bottom of the laptop there are 4 screws. Inside of the memory compartment on the bottom there is one more screw. Two of the catches are shown in the picture below.  Unplug the keyboard and remove it.

After you remove the 6 screws that are under the keyboard the top half comes apart by undoing the several catches located around the outer edge.  You might need a small flat blade screwdriver to unhook them.  Disconnect the touchpad as you lift off the top half.
Once the top is off the screen can be unplugged.  Unscrew the wireless adapter.  Remove two screws one is hidden under the ribbon cable.  Remove three screws and remove the cooling fan. You should now be able to remove the motherboard.
I was taking it apart to fix a broken power jack.  However the jack was fine the problem was the AC adapter.  The outer braid goes bad about 1/2 an inch short of the plug.  You could likely fix it by removing the insulation and wrapping the ground braid in some fine like 22 gauge copper wire.