I seem to have found a fix for my Equinox burning so much oil. I did a video showing the blow-by before and after treating with CRC GDI Intake Valve cleaner and Seafoam. I added a can of seafoam to less that 1/4 tank of gas - thats twice the recomended mixture. When I was done with both things there was black suit on the pavement near the exhaust pipe. Blowby was reduced dramatically. Before the paper would float an inch above the oil fill opening after treating the paper covered it with no problem.
I had been using cat cleaners with every fill up for years! Sometimes it would work but it was perhaps counterproductive. With all the blowby the catcleaner would get into the oil and thin it out. Then more oil would get burnt and dumped into the catalytic converter. So I fianlly found a way to treat the problem at the source.
I think the CRC cleaner might get to the rings as well. However there was some brown foam coming out of the port where I was spraying the Seafoam into.
Here is before and after readings on the lower O2 sensor.
The O2 sensor did go back to spikeing after driving for a while but the check engine light is still off.
It has been a month of a comedy of errors. My regular place to get the car inspected was having issues with its inspection machine. He said to try back next week. It was still bad the next week, so I called another garage. They were booked for 2 weeks but they could get me in then. Then the problems arose. The brakes started grinding, the check engine light came on, etc. I think the check engine light comes on every year just to remind you to get the car inspected. LOL.
So the brakes were replaced but the check engine was the lower O2 sensor and the catalytic converter. I added some stuff that promised "double your money back if it fails inspection" to the gas. I think it was from CRC. The car came with a spare O2 sensor so I had that installed. Then it came up with several codes all pointing to the O2 sensor. So I went and bought another O2 sensor, but it had a code as well indicating slow response from the O2 sensor. I was starting to think the wiring was bad. At this point I checked the collection of sensors.
The spare that came with the car DID NOT FIT the car! (It did physically)
The replacement I bought was a "universal" replacement.
So I bought an OEM exact replacement and it looked just like the original one on the left in the picture and guess what? After lots of prayer and parts swapping it worked!
O2 sensors
Now I have a collection of O2 sensors to look at. I might try returning the one that was brand new but threw a code.
Well it has almost been a year since I purchased the Chevy Equinox. It has been an expensive year at that! I cannot remember what some of the prices were so I guessed what they might have been.
First year repairs:
Starter ~$200 (Replaced it myself) Water Pump $700 VVT Valves ~$200 HP Fuel Pump (Twice) ~$300 (Had striped bolts, needed helicoils installed) Alternator ~$500 Front Brakes ~$500 Wheel Bearing $375 Throttle Body $100 (Did not help anything) Oil Pump $450 (Lost oil pressure when idleing when hot) Approx Total: $3325
Still needed:
Rear Brakes $400 Front tires $500
The problem is that the high pressure fuel pump puts a load on the cam shaft that puts a load on the cam shaft actutor, then the timing chain, then the timing chain guides and tensioner then the oil pump. On top of that direct injection does not clean the intake valves that get covered in burnt oil from the PCV valve. On top of that it takes a quart of oil every 1,000 miles because of low tension piston rings that do not clean up all the oil so it gets burnt onto the rings thus cakeing them in burnt oil.
At one point the car would go into limp mode and shut down every mile or two. I really struggled to get it back home. It turns out that the HP Fuel pump had broken, the spring was completely detached, and it was pumping gas into the oil as well as leaking gas on the motor front. One of the pump mounting bolts had broken in half!!
BTW, this is how to fix an Equinox that will not start (that still has dash lights), just unplug the circled connector on the computer and then plug it back in (This also erases all problem codes):
Since I wrote this it developed another issue. It would stall sometimes when you stop and sometimes when you almost stop to make a turn. Then it went into limp mode and would not leave first gear. So I added some Lucas transmission fix and it has not stalled since then. It does still sometimes have a rough shift down so I think it needs to have the transmission fluid changed.
Well the Ford Taurus developed a really bad brake fluid leak. i crawled under it and discovered that the drivers side rear tire support had rotted out, as well as the brake lines.
I fixed that with expanding foam. It actually drove better!
Between those issues, it getting stuck in first gear, the AC not working and a few other issues it went to the scrap metal heap.
Yes, I bought a New-to-Me 2011 Chevy Equinox knowing that was a problematic year. The crux of the issue is they added a high pressure fuel pump that overloads the timing chain that then fails. It has a new timing chain, actually the previous owner had it replaced twice! It also had high pressure fuel pump issues and a bad catalytic converter. On top of that it stalled every time you slowed down or stopped.
FOLLOW UP - It turned out the water pump was bad, whoever changed the chain did not replace the water pump. On top of that the exhaust manifold was cracked, my mechanic welded it back together. Also someone had drilled a hole in the intake manifold, on the bottom side, so it was missed at first. I think they were trying to duplicate the effect of the oil catch can.
My mechanic friend replaced the Variable Valve Timing selenoids and now it runs much better. They had been replaced SEVERAL times before. Use premium ones!
Next I added Dura Lube Severe Catalytic & Exhaust Treatment to the gas. After about an hour of driving the check engine light went out so I quickly got it inspected. The check engine light has stayed out and there are no error codes other than an occasional fuel pump error.
Then the next day the starter died in my driveway. So I repleced the starter and the car was back up and running. It took an hour but the ground clearance is enough that you can do it without jacking up the car.
Then I added an oil catch can to reduce the amount of oil that is sucked into the engine to clog the catalytic converter.
Next up was replacing the fuel pump and checking the PCV valve opening on the intake manifold. I also got pictures of the intake valves. The pump was easy to remove. In fact it was too easy. When I went to put it back I discovered that the screws were badly stripped! Then I notice that the old pump O ring was shot and that oil had been leaking down the front of the engine!
The fix I used was to use some 7/16 screws instead of the 10 mm screws (on the left in the picture). I did not have a tap so I put the 7/16 inch screws in about 1/2 an inch then tightened nuts on the screws to hold the pump in place until I can properly tap the holes.
The intake valves were caked in carbon build-up. This is a picture of a better set of valves. I hope to use some intake valve cleaner on them. I did spray some carb cleaner on them while I had the intake cover off.
This picture shows the oil that had been leaking down the front of the engine. The oil filter cap is also messed up...
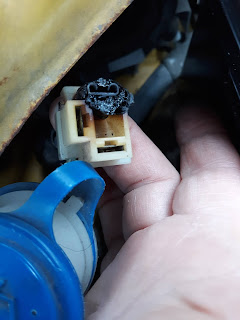
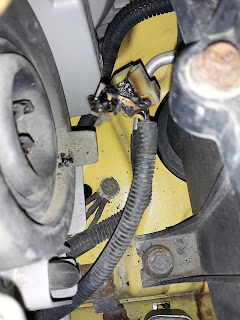
My daughter said that one of her headlight was rather dim. When I opened the hood I immediatly smelled the burnt electrical smell. I looked at the dim headlight and the ground connector was burned off. I attempted to cobble the bad headlight connector. Then when I tested it the other headlight went out. It had the exact same issue.
Burnt Aveo Headlight Connector
Burnt Aveo Headlight Connector
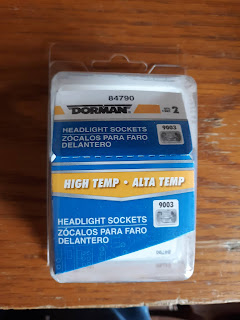
The fix is at auto zone, For 13.99 you get two headlight socket replacement connectors with short wires attached. The repair kit is Dorman 84790 and it includes two sockets.
Headlight Socket Repair Kit
This is the left passenger side headlight repaired. You will need to also purchase 6 red crimp connectors.
This is the right, drivers side headlight. The fill tube for the wipers can be removed to give more room to work.
My car would not start this last Saturday. The dash would light up but it would not even try to start. The next time I tried it the battery was completely dead. So I bought a new battery and it still would not start. Eventually I realized that the radio was dead and the interior lights were dead. I chased the issue to the "BCM" located on the right side of the center console. The red/black wire going to it was dead. So I jumped it to 12 votes. Now the lights and radio worked but it would still to even try to start!
I checked the fuses at the main fuse box, fuse 4 and 6 that go to the BCM but they were fine. So I completely removed the fuse box to inspect it and found nothing wrong. Then while searching the internet I discovered that the BCM gets its main power from the battery via a 50 amp fuse next to the battery. After checking the fuse, I tried putting a test tone on that wire to follow it to the BCM but it was almost completely shorted out to ground. I removed the 50 amp fuse and cut the wire at the BCM but it was still almost a short to ground.
The test tone on the wire disappeared behind the passenger seat. So I removed the passenger seat, cut the carpet and exposed the wiring. The carpet was very wet and covered in red rust. The bottom side of the wiring harness was rotted through, some wires were completely gone. Some were melted together. Others were burnt.
This picture shows the burnt wiring harness.
This picture shows the area where the seat was removed and the rust on the carpet.
I do not know where all of the water is coming from, but the water rusted everything and rotted out the wiring harness.
Recently one of the windshield wipers on my HHR stopped moving. I removed the plastic cover and discovered that the wiper arm had become disconnected. One of the little plastic bushings would no longer hold onto the ball joint it was supposed to be connected to. After chiseling off the catches I removed the plastic bushing and figured that it would be no problem to replace it. NOT!
First I tried Dorman kit 49455, they were way too big.
Next I tried Dorman kit 49449, they were way too big.
Next I tried Dorman kit 49447, it is a 10 bushing assortment kit, two of them actually fit the ball joint. The ones that fit were the ones that are shaped like a cowboy hat. To get them to fit on the arm, I had to trim the bottom ridge off to make it smaller. Then a pair of channel locking pliers squeezed the bushing onto the ball joint.
This is what the finished repair looks like.
I used channel locks to squeeze the bushing into place.
This is what the assembly looks like under the plastic cover.
I started about three months ahead of the inspection due date. First I replaced the windshield that was cracked. I found a deal where it was $200 instead of the usual over $300. Then the brakes were rebuilt and one of the wheel bearing was replaced at over $600. Then I was quoted $300 to replace the two "GM VVT Control Valve Solenoid" valves on top of the motor. I did that myself for $18 by buying the parts on eBay. After that repair the check engine light went out. Before I could get it inspected the check engine light came back on!
After checking everything and cleaning the Mass Air Flow (MAF) sensor I gave up and took it back to the garage. As I drove it there the check engine light went out! However it failed inspection because it had not been driven enough. So I was given 10 days to fix it. The garage said they had fixed a vacuum leak. The next day the check engine light came back on!
So I spent a Saturday trying things, one at a time, to fix it. One thing I needed was something that could tell me if the problem was fixed without having to drive it many miles to see if the check engine light comes back on. This code reader was the solution. It read a "permanent" code 171 - fuel too lean.
Next I replaced the spark plugs. That helped some and cleared the permanent code but soon a "pending" 171 code came back up. As you can see the plugs were in rough shape. I replaced them with AC Delco plugs.
Next I replaced the MAF sensor that I had cleaned earlier. That fixed the problem. It has some slots in it that I had sprayed the cleaner in but that was apparently not enough to fix the problem. So after 10 days past due my car finally passed inspection.
My HHR started sounding more like a tractor. I could not see the problem but I could feel the heat coming from this joint. As you can see it was rusted out.
I purchased two 2 inch pipe clamps at the local car parts store. They are Ni Exhaust Solutions "Split Flange". Each one comes with two bolts. They have to be pried apart and worked back and forth until they open and close. Then, open one side of both clamps and put a bolt through the closed sides. Then rotate them into place so the first bolt is above the fitting. Then close the flanges and install the lower bolt. It took me over an hour to close the lower flanges. If you can get them close to closed you can get a flat blade screwdriver in there and close them the rest of the way. Then install the lower bolt. That took a long time as well. One of the issues is the metal gasket gets in the way. I think I managed to damage the gasket as once it was together it still leaked. But at least the pipes were not going to fall off the car!
Here is the clamp once installed. It was hard to tighten the upper bolt as the socket set would not click in the short space.
Split Flange Clamps
It still leaked so I covered the whole thing with J-B Weld "Muffler Weld" Cement.
J-B Weld Muffler Cement
That solved the problem for now. I know that eventually I will need a new exhaust but for now the leak is fixed.
My wife's car had the heat stuck on for the passenger side only. It was way too hot and it would not turn down. The problem was a motorized door that was stuck.
Here is an excellent video on how to change the actuator.
I used my fingers to disconnect the electrical connector and that might be easier to do before the actuator is removed. It is identical to the other connector to the right so you can see what your are feeling for. Basically you push in a small tab in the center and pull up on the wires.
Here is an great picture of what to look for behind the glove box.
This is how to test the heating and cooling system.
Turn the heating/cooling system off before you start.
The self-test can be initiated after cycling the ignition switch from OFF to ON.
For the self-test, press the OFF and DEFROST buttons together and release them.
Then press the AUTO button - ALL within 2 seconds.
The display will show a moving bar-graph icon for 20 seconds.
If diagnostic codes are present, they will be displayed.
My codes were "12 42" and "22 67"
When done press any button to exit.
Wait 30 seconds to turn the key off for the computer to re-calibrate.
Here is a picture looking into the glove box area.
This picture is going in a little closer. I moved the white wire harness down out of the way.
Here is the tool setup I used to get to the back screw. I had to purchase a 1/4 inch universal joint for $5 that you cannot see in the picture.
Here is what is inside of the actuator. You can test the motor with a 9 volt battery. The two connections to the motor are on the right side (back) of the motor. My motor turned a couple of times and stopped. I thought maybe the mechanics were stopping it, but no it was the motor itself.
***UPDATE *** A year later I had the same problem again!! This time I cut away the wiring cover above the actuator with a razor knife. Then I used wire cutters to cut the plastic next to the wire so as to not cut the wires. Then I drilled a tiny hole and put a 2 inch deck screw into the black part of the actuator so that it can be locked in place on either hot or cold depending on the time of year.
This fall my HHR started having issues with starting. By Christmas time it no longer started. At one point I spent over 30 minutes trying to start it. When it started there was a multicolored puddle of gas under the tailpipe. It always smelled of too much gas. I changed the spark plugs and the old plugs were covered in black from too much gas.
The HHR would sometimes start, and if I pumped the gas it would eventually sustain. Eventually I discovered that if I floored the gas pedal before starting it it would usually start. Through research I discovered that flooring the gas pedal should shut off all gas to the motor! Eventually the check engine light came on. Here are the codes and what they meant.
The codes are:
P0300 Engine Misfire Detected
P0107 Manifold Absolute Pressure (MAP) Sensor
P0122/P0123/P0223 Throttle Position (TP) Sensor.
P0171 System too Lean
The auto store wanted over $250 in parts. I bought the MAP sensor on eBay for $10 and the Throttle body form the 1490 motors (an auto salvage place) for $40. The exact same codes came back on again. I was getting really frustrated. Then I got thinking, how could so many sensors be so wrong? So I decided to replace the motor ground wire. When I looked at the old wire one end seemed loose. I puled on it and the wire came right out! After close examination I determined that the wire was never crimped into the connector.
Here is the new crimped and soldered triple ground wire. It runs from the right side of the motor to the right strut tower.
This is a close up of the bolt on the cam cover that the ground wire is connected to.
Now I just touch the key for a fraction of a second and the car starts right up!
UPDATE - 3 months later and still no problems. There has been little if any loss of Antifreeze nor any overheating of the motor.
UPDATE - 1 year later, I have added about one quart of antifreeze over the past year. However the car is running on the hot side around 207 degrees. There is no sign of foam in the oil or the antifreeze. I started adding antifreeze every few weeks.
UPDATE - After 14 months it is going through a quart of antifreeze every two weeks. There is some foam on the antifreeze filling cap. I added the other 1/2 of the can of the gasket repair solution.
UPDATE - FOUR YEARS LATER it is still running, it takes about a quart of antifreeze a year.
My HHR overheated again only two months after the last time that I tried to fix it. The radiator was down about two quarts of fluid. This time I decided to spend some more money and get something that stays in the radiator. It is called "Bar's Leaks Professional HEAD SEAL Blown Head Gasket Repair" and runs about $45. Just add 1/2 the container to the antifreeze - for a 4 cylinder engine.
Bar's Head Gasket Repair
Its only been a few days but so far so good. I might have to change the oil once again. It looks a little brown. There was no foam on the oil fill cap this time.
My HHR overheated at a red light. With the heat on I was able to get the temperature down to 235 degrees. I added a gallon of water but two days later it needed more water. Then I noticed that it was leaving puddles of water in the driveway under the exhaust pipe and spraying water 2 feet out from the tail pipe. Then I saw the water bubbling in the radiator cap. Is that absolute proof that the head gasket is blown? After some praying and searching I used K&W Head Gasket Repair and now it is running fine again.
The directions require that you drain the radiator first and fill it with water. Finding he drain in the HHR is next to impossible. You cannot see it from above or below. If you pull back the radiator plastic cover on the left side you might see one white plastic ear. It is barely reachable but it can be removed.
This video shows the bubbling.
The thermostat is also next to impossible to reach. You will need a 10 mm socket and several extensions to get to the bolts. You cannot leave the thermostat out as it will leak. The seal is part of the thermostat. But opening it up makes it easier to flush the cooling system.
After running the car for a while you once again drain everything and refill the cooling system. I did not think it was fixed because it was still running over 210 degrees. However the radiator cap now had a seal when you try to open it. Over the next few days of running the temperature slowly came back down to normal 196 degrees.
These cars run hotter than normal because the thermostat is on the return line from the radiator. If the radiator offers 16 degrees of cooling then a 180 degree thermostat will allow the water to run at 196 degrees. It gets even hotter while sitting still because the radiator fan does not come on until it reaches about 220 degrees.
The other day I broke a socket while changing a spark plug! At first I panicked. How do I get the broken piece(s) out from way down in there? First I checked the remaining part to see if it was magnetic, it was. Then none of my magnets would fit down in the opening. So I used a magnet and ran it across the end of a flat blade screwdriver. That did not work. Then I took a stack of magnets and ran that across the end of the screwdriver. That gave the screwdriver just enough power to just so lift the part up to where I could get a hold of it. Whew!
After breathing a sigh of relief I then changed all of the other spark plugs with a different socket.
It looks like the socket was made with powdered metal. Somehow there must have been a weak spot that gave way.
My Cobalt was hit by a deer and sustained over $1000 in damages. For a 2007 with 165,000 miles that is essentially totaling the car. SO I traded it in on a 2010 HHR that needs some minor repairs.
The hood was black (it had been in an accident) so I wire brushed it and put some white primer on it until I can afford to have it professionally painted.
One of the issues was strange noises coming from someplace in the back when going around corners. I had already dug all the way down and removed the spare looking for the issue. Maybe there was something in the gas tank? The second time I took out the spare I looked behind the battery area and found a golf ball. Before long I had pulled 6 golf balls out of that area.
I decided to replace the air filter and discovered that changing the air filter on the HHR is a nightmare. You have to unplug the MAF sensor, and disconnect three hoses. Then you can remove the air filter assembly and turn it over to remove 7 Torx screws. Forget that. I found this ad for a replacement for $75 on eBay.
The kit arrived in less than a week in a relatively small box. It was only about one foot square in size. But everything was there.
The changeover takes about 1 hour to complete. Here is a before picture:
Here is an after picture:
I could not figure out how to "bend" the included metal strap to hold the air filter in place so I used some wire ties instead. The oil fill spout extension can be removed. The cap will fit directly on the engine. The spark plugs are next to be replaced now that I can actually find them....
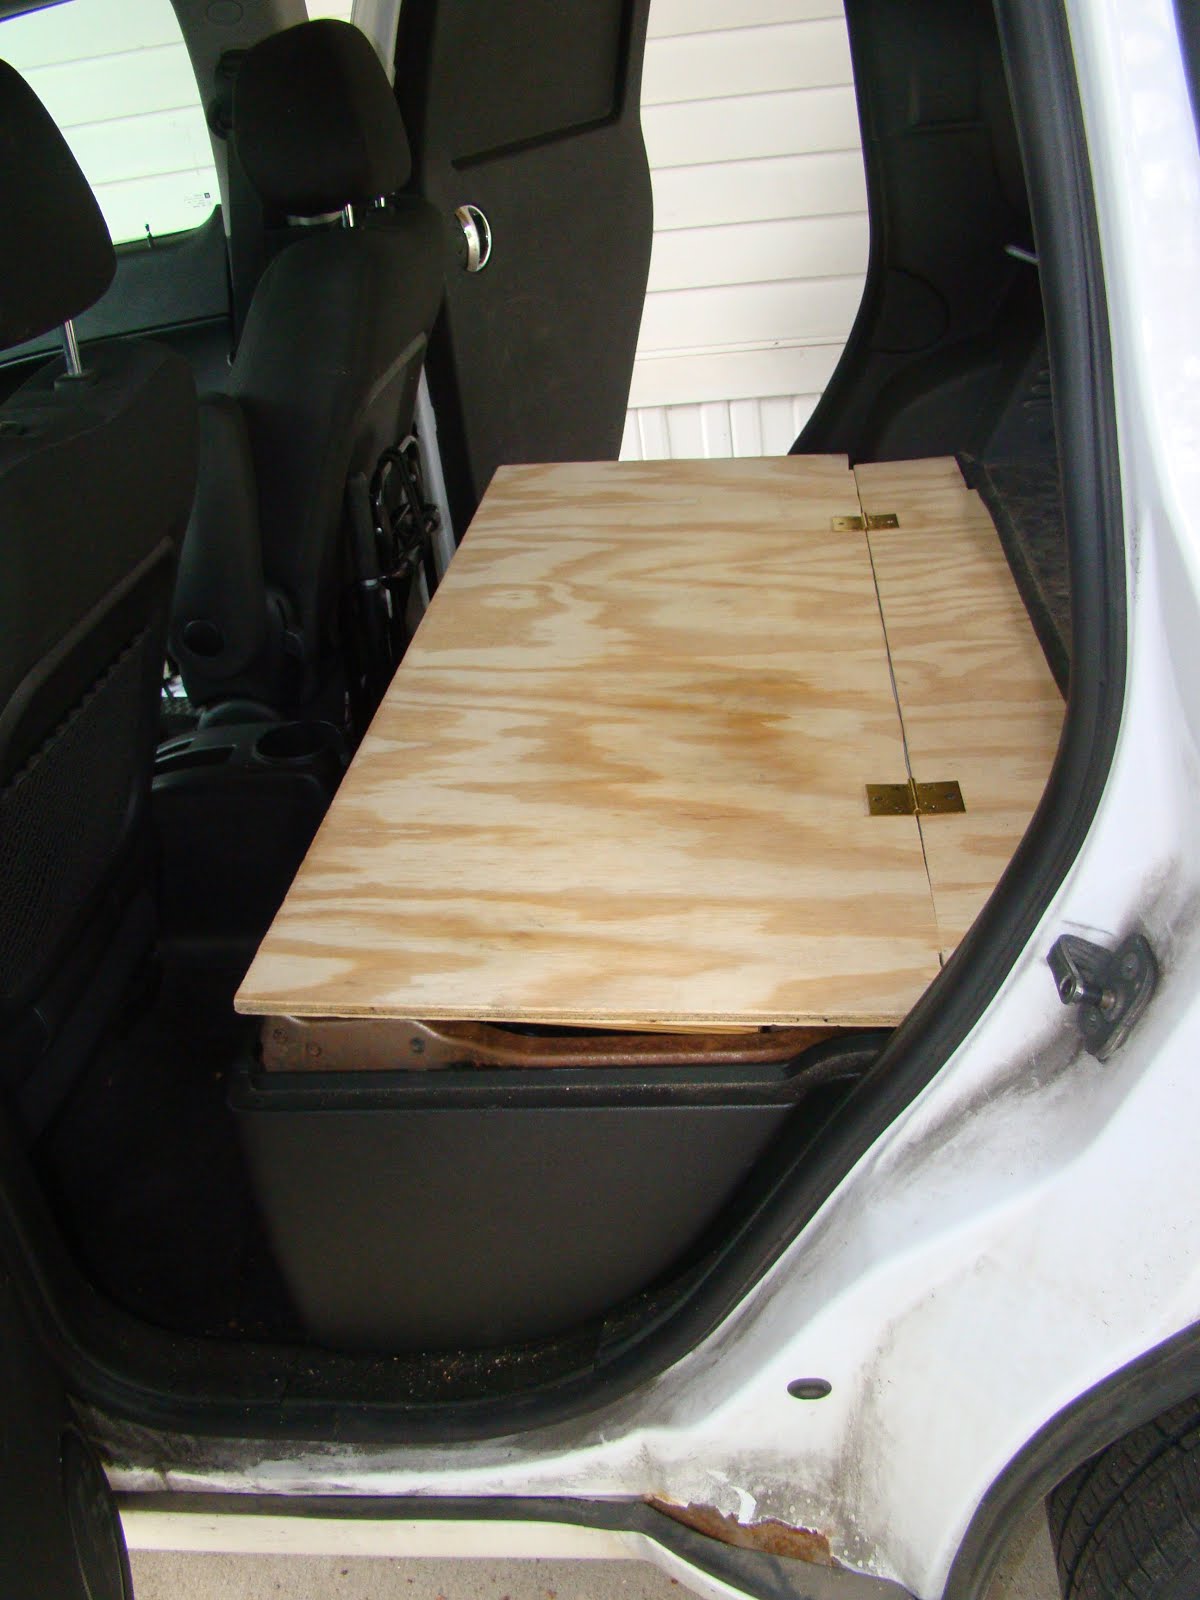
The HHR did not come with a back seat. It had the metal frame that was designed for use with storage bins. The storage bins list for $700 from Chevy! So I made my own storage area using some plywood.
I will need to make some wood trim to go around the outside edge. Here is the view from the back side.