Tuesday, April 14, 2009

VE170 LCD monitor repair of inverter

If you would like to donate your old LCD monitor and see how it was fixed here on my blog, please contact me. The same goes for P3 or newer laptops. I love to recycle these and donate them to pastors and missionaries.

Two of the LCD monitors that I purchased really cheaply on EBay had bad inverters. I had never successfully fixed a bad inverter before, even after trying to fix them a lot. But this time I was in luck, every one of the bad inverters had a little silver 22 uF capacitor that was bad. Replace that capacitor and the inverter works! You can optionally replace the power supply filter cap, it was bad but did not appear to affect the monitor. Below is a picture of the inverters with the capacitors replaced. You can use a 10 uF at 25 volts to replace the bad capacitor.


Next I needed some 12 volt 4 or 5 amp power supplies for these monitors. They sell for around $25 on EBay. That is unless you look for universal LCD monitor AC adapters. They sell for $10, and the text says they support the VE170 screens!

Monday, April 13, 2009

Intro to the Basic Stamp - 7 segment displays

Interfacing the Basic Stamp to dual 7 Segment Displays
This requires two seven segment common anode displays and 16 x 470 ohm resistors.


Connections to the LA-6460 - Looking Down at the display from Above.

G F + A B
.___.
!___!
!___!

E D + C DP

It is wired up so that D0 goes to A, D1 goes to B, D2 goes to Dp, D3 goes to C, etc. Each segment connection is made with a 470 ohm resistor. The + goes to 5 volts to power up the display.

The first problem is to output the 8 bits to the I/O pins to light up the LED segments. For this we use the lookup command to find and then output a set of binary bits that set a 1 or 0 to each associated bit or segment position. A 0 will light up a segment a 1 will leave it unlit. However this outputs bit 7 first, on the left, and bit 0 last, on the right. So the 1's and 0's have to be encoded in the reverse of their segment order.

The 'OUT' command reverses the order so the segments order in software is;
F G E D C Dp B A - Segment order.
It could also be that I have them wired backwards?

Bit Segment
7 - F
6 - G
5 - E
4 - D
3 - C
2 - Dp
1 - B
0 - A

See it working on YouTube;

http://www.youtube.com/watch?v=Ouc4odEDCVA
Here is the code to make it all work. Note that percent, zero, zero is missing from some of the lines of code. Somehow blogger takes it out every time.
--------------------------------------
' {$STAMP BS2e}
delay CON 1000
upnum VAR Nib
lownum VAR Nib
DIRH = %11111111
DIRL = %11111111
n0 CON %01000100
n1 CON %11110101
n2 CON %10001100
n3 CON %10100100
n4 CON 110101
n5 CON 100110
n6 CON 000110
n7 CON %11110100
n8 CON 000100
n9 CON 100100

DO
FOR upnum = 0 TO 9
LOOKUP upnum, [n0,n1,n2,n3,n4,n5,n6,n7,n8,n9], OUTL
FOR lownum = 0 TO 9
LOOKUP lownum, [n0,n1,n2,n3,n4,n5,n6,n7,n8,n9], OUTH
PAUSE delay
NEXT
NEXT
LOOP
END

Saturday, April 11, 2009

Intro to the Basic Stamp

My interest in the Basic Stamp started as an upgrade for several of my inventions. Many years ago I designed several devices and several of them were published in electronics magazines. They included things like an LED sign, an O'Scope, an Audio analyzer, a video grabber, an energy management system, and even a heart monitor. The problem is that all of them used the printer port to connect to the computer and all of them used GW Basic as their programming language. However finding a laptop that has a printer port or that could run the old version of GW Basic is nearly impossible these days.

I had played with an 8052 Basic processor as a possible solution but even that processor is out of date. I also had some 68HC11's laying around but they are programmed in Assembler and I wanted this to be something an average person could work with. So I concluded that the best option available is the Basic Stamp.

Once I decided on the Basic Stamp I went on EBay and started looking for a simple proto board and processor that is cheap. On eBay I found a cheap circuit board from www.pcboard.ca called the Proto 24. I bought the blank version because I have lots of parts around to populate it with and I like to solder things together. I did not have a right angle 9 pin serial plug so I cut the plug off a serial cable and glued it onto the board. Then I soldered the wires into the correct holes.

When I first started working with the Proto 24 board and a Basic Stamp 2e processor I could not even do something as simple as getting an LED to turn on and off. It turns out that this circuit board has the pins labeled in reverse order! Output 0 is on the left where it says C7 and output 15 is on the right where it says A0.


Proto 24 board web site - http://www.pcboard.ca/kits/proto24/

Steps to get the Basic Stamp up and running;
1. Download and Install the Basic Stamp Editor program.
2. Plug in the AC adapter, the LED should light.
3. Connect the serial cable, must be a 1:1 cable not a null modem.
4. Start the 'Basic Stamp Editor' communication program.
5. Hit F6 to find the Basic Stamps serial port.
(It should say 'COM1 Basic Stamp 2e')
6. Select 'directive' 'stamp' and 'BS2e' to identify the stamp chip.
7. Press enter and then type 'debug "I am here"'
8. Select 'Run', 'Run'
A window should pop up and say 'I am here'
That's it, you are now up and running!


In the next article I will tell you how to set up a 2 digit counter using 7 segment LED displays. Then I hope to show you how to set up an 8 x 8 LED array.

Friday, April 10, 2009

VE175 LCD monitor repair

I sold something on eBay and had some money to spare. I also needed a LCD monitor for a friend so I placed a minimum bid on some LCD screens that needed repair. To my surprise I won several auctions! So hopefully I will be posting repair tips for several of these monitors over the next few days.

Up first is a Viewsonic VE175. The picture comes on for a second and then goes out. I opened up the monitor expecting that the power supply had bad caps in it but that was not the case. The bad caps were on the control board. There are 5 of them that needed to be replaced. They are the bigger ones that are bulging at the top. One of them even has stuff oozing out of it. Most of them can be replaced with 1000 uF 16 volt capacitors, you will need some 470 uF 25 volt caps too. You can almost always use a slightly larger value or higher voltage capacitor.


If you have never replaced motherboard or power supply capacitors before you will need to know some tricks. First you need to add fresh solder to get the heat to travel through the board to remove the old capacitor. Second use a tiny screwdriver to clean out the holes for the new capacitor.

Saturday, April 4, 2009

Write protecting USB memory sticks

Have you ever plugged in your USB memory stick and then get a warning message saying that a virus has been found on it? The anti virus program will remove the virus but how did it get there to begin with? The signs that your memory stick is infected may include an executable found in each directory on the memory stick. For instance a utilities directory might have a file called utilities.exe that is the virus. Also look for a hidden system directory in the root directory called zpharaoh. The problem with virus' on memory sticks is so serious that the Pentagon recently banned all USB memory sticks.

After a while I found the infected computer that had put the virus onto my memory stick. Every time I plug in the memory stick the virus infected it and disabled the anti virus program on the memory stick from being installed in order to fix the computer. There are two possible solutions, one is to boot from a CD and then reformat the hard drive, just reinstalling Windows will not remove the virus. The other solution is to remove the hard drive and set it up as an external USB drive with an IDE to USB adapter. Then you can either scan the drive and remove the virus or you can at least copy all of your important files off the drive before you reformat it. Below is a picture from scanning the hard drive as an external USB device. Make sure your anti virus software is up to date before doing this or your computer will be instantly infected.


If you remove the virus from the drive with an anti virus program make sure that the virus infected files are actually deleted. Some anti virus programs will see that they are critical system files and will not remove them unless you tell it to remove them. Once the hard drive is cleaned you can reinstall it into the computer and then you will need to reinstall Windows, but be sure to do a clean install of Windows or there will still be several programs that will not work such as notepad, paint, etc.

Another solution would be to write protect the USB memory stick, right? Well doing that is not as simple as you might think. The computer has to be able to send things to the memory stick in order for the memory stick to know what you are looking for on it. So you would have to write protect the memory on the memory stick but you can not disable writing to the memory sticks controller.

My brother suggested that I try using camera memory sticks, because some of them have write protection built into them. First I tried using a SD memory card and a USB adapter. However thought matter what position the write protect switch was in the memory can always be written to. As it turns out the SD card depends on the device it is plugged into to prevent writing to the memory. No USB adapter bothers to read the status of the SD cards write protect switch and so they allow you to write to the SD cards memory either way. Most of the newer SD cards do not even have the write protection switch on them.


Next I tried using a Sony memory stick. I happened to have one of them in my older Sony camera. It worked perfectly allowing you to read from the memory stick but when you try to write to it a message comes up saying that it is write protected. However like the newer SD cards the newer Sony memory cards no longer have a write protection switch on them. The older memory sticks are called 'Memory stick' and 'memory stick pro' and they have the write protect switch but not the newer ones that are called 'memory stick pro duo'.


The size of the ones with the write protect switch goes up to 512 MB and there are some 1GB memory sticks with a write protect switch but not all of them. Many of the imitation Sony memory sticks also have the write protect switch as well. However 512 MB is usually enough memory to put all of the necessary utilities on it. The older Sony memory sticks do not fit inside of the USB adapter, they stick out of the end and prevent putting the cover back on.


I would recommend that you have the following programs on the protected memory stick;
AVG - Free anti virus program
Startup - Removes programs that are starting automatically
MRT - Microsoft malicious software removal tool program
Stinger - McAfee's free program to scan and remove virus's

Friday, April 3, 2009

Dodge Caravan/Voyager Strut tower repair

I know that I do not blog much about car problems. There was a day when I fixed most of my own car problems. However this repair was a bit over my head. My drivers side strut mount had rotted out as you can see in the picture below. If it is not fixed the strut can come up through and the car will then fall down and be totally disabled.


This problem would send most cars to the junk yard. But I thought I would research the problem first. It turns out that most places will charge you around $1000 and they will weld in a replacement strut mount from another car.

Well it turns out that if you will go to the car dealer, they have what is essentially an upgrade to the strut mount. I got it done on my van for $450 and taxes. There is a place in Ohio that says they will do it for $300. However I did not think my car could be driven that far.


This is what the repair looks like. They did both sides. As I understand it, the repair piece is also glued in place besides the several bolts that you can see.
Here is a link to the guy who fixes them in Ohio for $300. He uses rivets instead of bolts and that should be a better fix IMO.

Saturday, March 21, 2009

Another virus thwarted

It seems like every few months I get a virus that I have to deal with. My favorite thing is to switch to another hard drive with a clean install and then copy my files back off the old hard drive via an IDE to USB adapter. However I did not have a spare laptop hard drive available and the first two I won on eBay did not work!

The last two virus' on my computer both came from searching the web. I remember when it was safe to search the web. In one case I was looking for help in fixing a LCD TV that just has a blue screen. The second time was from searching for how to remove the password from a laptop hard drive. It seems like there has to be a way to remove the password short of tossing the whole hard drive. I had Windows XP SP3 installed with all the updates, AVG running and telling me what sites are safe to visit, you name it I was protected, but it all failed to protect me.

The symptoms of the infection included lots of pop ups so I installed Spybot Search and Destroy. It found 38 problems including something that had shut down the Windows firewall. Upon restarting the computer, the virus was still there, so next I ran AVG in safe mode. It found two files and removed them. They were some sort of Trojan Horse Generic, but the virus was still there.

So then I went into manual virus removal mode. The first weapon was startup.exe, there were two strange programs running so I shut them down. That did not work, they came right back, as can be seen in the picture below. I found the files in the windows\system32 directory after I had turned back on the ability to view hidden system files in file manager. Then I tried to delete them or even to rename them all to no avail. Next I restated the computer in safe mode and was able to delete the files and also disable them using startup.


Thursday, March 12, 2009

Earthquakes, rumblings, and volcanoes

This is an ongoing story and I thought I would update it. Below is the seismometer located on Redoubt Alaska. Needless to say it was going crazy Sunday March 15th. It has since calmed down once again. Here are some links of interest;

Pictures from the small eruption at Redoubt;

Article about earthquakes in Richland Washington;
Article about earthquakes in Geyser California;

This is a picture of the smoke starting to rise over Redoubt.


Now for the big catch. According to their seismometers there are other volcanoes about ready to do something. Unfortunately I cannot get web cams to capture pictures from the other volcanoes.

A while back I commented on the strange rumblings that are going on. Well, they continue but after being quiet for a few weeks the number of earthquakes is on the rise once again. This picture below shows that there were 1003 earthquakes in the US in the last 7 days. That number is like off the chart! When I first started watching there were about 700 earthquakes a week in the US.

They were worried about Yellowstone. Now they are worried about Alaska. Alaska is really a rumbling. Note the cluster of earthquakes just to the left of the upper blue box. Is that a likely volcano site or what?


Then there is California. Need I say anything about that? You cannot even read 'Los Angles' for all of the earthquakes that are happening around there. There is also a hot spot in Geyser California, north of San Francisco.


Saturday, March 7, 2009

Hp Laptop Motherboards

Is it just me or are there a lot of HP motherboards with a broken power jack? Replacing the jack will not fix it as the board is damaged around the back, center connector.


The real solution is to run a 24 gage jumper wire from the shiny pad to the left just behind the power jack and just in front of the modem plug to the center connector of the power jack on the bottom side of the circuit board. That will replace the burned out traces on the top side of the circuit board. You might just be able to solder the jack on the top side if the run is not totally destroyed already. In most cases there is nothing left to solder it to on the top side of the board.

Friday, February 6, 2009

Africa March 2009

We are back in Accra Africa. We already received a testimony from the equipment that we brought over with us;

"Please Dad [Fred] tell uncle Robert that last Sunday we where on the campus for projection and 115 students gave their lives to Christ, Priase the Lord!"

This shows the van packed full. We had three suitcases and a carry on suitcase for each of the three of us. So there are a total of 12 suitcases for the three of us all stuffed into the van. Why is the background all white?

On this trip we brought;
9 Video Bible Schools
6 DVD players
6 Laptops
3 Printers
3 Projectors
1 Desktop Computer
1 Photocopier
1 Music Keyboard
1 Video Camera

On our first day we purchased a 17 inch computer monitor for $35 and a 25 inch Sony TV for $100. Both were purchased used at pawn shops.


This is Aldous with his new desktop computer. We dropped him off in Tamale to start a new Video Bible school there. He has everything he needs to make the teaching materials except for a stapler. Oops.
Young Albert with the computer we gave him.

Fred meeting with pastors in Accra.
Sunday we headed off on a trip to Tamale. We had to fix several problems with the van. Here is the list of needed repairs;

Growling sound from rear end? Not fixed yet.
Shows no oil pressure - was working, started working again.
Right headlight out - Type 9004 but no 9004 types fit it!!
Drivers side mirror - taped together.
Rear seat adjuster - taped together.

We spent about 2 hours trying to find a headlight that fits. Every 9004 light we tried did not fit the van. So it must be a special 9004 for a 92 Ford Econoline van.
We made it back to Accra with most of the driving done during the day because of the bad headlight problem. We did get one warning for speeding but it is hard to tell if you are in town or out of a town as there is sometimes little difference. LOL.

Fred speaking at the new Bible School in Tamale. We had 16 students interested in attending the Video Bible School. Aldous and Fred spoke and we saw a sample video from the school.

The students at the Tamale VBS watching a ISOM video on the TV


The sound guy at Cotonou Benin, with one of the donated laptops being used to record the message. They had been hauling around and using a desktop computer.

Do you remember VW bug stuffing? They used to see how many people you could fit in a VW Bug. We took that a step further. How many people can you fit in a bug and still drive on African roads? We could not make it over a cement bump at the top of one hill until Fred got out.


Marie-Louise found this little kitten at one place where Fred was teaching. It is so young that its eyes were not even open yet.


Well that's it for my part in this trip to Africa. Now I am working on stuff to send back over to them.

Monday, February 2, 2009

Government Stimulus

I thought I would give my opinion on the so called 'Government Stimulus'.

Since when does taking money from the poor to feed the rich solve all of the problems with the economy?

Since wanton government and financial company waste got us into a really big mess, why would encouraging more of the same solve the problem?

Since 'we the people' are getting out of debt, why would more government debt solve the problem.

So we should borrow money from our children, likely even our grandchildren, to give to our financial institutions so they can waste it?

After being unemployed for 6 months, I recently cashed in an IRA from 2001. I had deposited $5000, and a year ago it was up to $9800. When it dropped down to $8000 I told them to put it into something that will not loose any more money. When it reached $4400 I cashed it in. I not only lost all of the interest I lost some of the principal.

The US government will eventually collapse unless they stop all of this nonsense!

What is the solution? Reduce taxes! Instead of complicated methods of 'redistributing the wealth', just cut taxes on the poor.

Saturday, January 31, 2009

Emergency Laptop Repairs

We are 4 days from leaving for Africa and a Dell C400 laptop had its cooling fan quit. What do I do when there is not enough time to order a new cooling fan? Cobble the repair, so here is how it is done. First I replaced the fan with a normal cooling fan, it is glued into place. I cut the top edge of the fan back a little bit to allow more air to escape towards the CPU cooling heat sink.


The next problem is that the old fan ran on 5 volts and the new one runs on 12 volts. So I had to tap into 12 volts somewhere and here is where I did that.

Thursday, January 22, 2009

Cheap printer Cartridges

About a year ago I bought some generic ink cartridges on EBay. They leaked and were replaced with a second set of generic cartridges. Unfortunately they did the same thing. It was so bad that the blue turned red from the leaking ink! Note that the only clean one is the Real Epson cartridge. The moral of the story is to use the genuine ink cartridges.


Frozen Pipes

I returned from Florida to find out that the heat was off and that the pipes were frozen and had burst. Some of the valves and fittings were burst as well.


So I moved the sink out of the way and cut a hole in the floor to find the breaks in the pipes. Three of the pipes were broken as well as some fittings.

I removed all of the copper pipes, then started in the basement and ran all new 1/2 inch CPVC pipes. OOPS! I had to open it all back up and put in a new drain to the sink..

Then we replaced the drain to the tub as well. this required cutting a slot into the wall. You can see the water damage in the discolored wall paper.


The new drain pipe runs all the way down to the basement. We covered it with new 3/8 inch sheet rock so it all looks great now.


Monday, January 12, 2009

Yellowstone Rumblings and Earthquakes

I thought I would update this post by showing a map of the US and the locations of all of the earthquakes that have happened in just the last week. It is getting crazy. They are now predicting a volcano in Alaska as well as Yellowstone. What about southern California??


Rumblings, that's how I would describe it. In the news just a few days ago there was a report on the rumblings at Yellowstone. They quieted down on Jan 2 but rose up again on Jan 9 then quieted down again. The picture below is from Big Hole Peak Montana where there are rumblings going on now. As you can see after a few hours it quieted down too. What is going on here? I found similar results for January 2 and December 29 th.


If we hop over to Whitefish Montana there is something going on there too. This is more like an earthquake or more like a swarm of them, smaller ones at that. This has been coming and going for a few days now.


What do I think about it? I do not have a clue. Someone speculated that it could be caused by waves of magma moving. There is no evidence as to what it is. I read someplace that it could just be miners blasting, at least the collection of smaller earthquakes could be that. Who knows but there is something unusual happening.

Here is a link so you can check them out for yourself.
http://earthquake.usgs.gov/eqcenter/helicorders.php

Friday, December 26, 2008

New Can crusher / Washer Launcher

I am working on what will be the biggest washer launcher or can crusher that I have ever made. If you have not seen the old washer launcher or can crusher videos on YouTube you have to see what happens when 800 volts DC is applied to a flat coil under an aluminum washer. The washer flies over 30 feet straight up. If a soda can gets in the way it can get flattened. If you place a soda can on top of the washer it ends up about 1/2 inch shorter just from the g forces.

As I was going though some of my old pictures I could see the history of my invention. First I built what was called a 'thumper' on the Internet. To make a 'thumper' essentially you take the flash from a camera and add a coil in series with the flash tube. This 'thumper' design is available on the Internet just google for a 'magnetic thumper' or 'magnetic thumpy'. Below is a picture of my version of that device.

Next I replaced the flash tube with a big SCR. I had a pile of those big SCR's that were left over from making a time machine, but they were accidentally sold at the Rochester Ham Fest in around 2005. You can see them in the background of the picture. I also started adding more capacitors. Notice the home made aluminum washer sitting on the coil. That was from before I discovered that hard drive platters make great aluminum washers. As you can tell I was already sending aluminum washers into flight. In those early days the washer flew just a few inches.

Soon I took the washer launcher to the next level. First I used 4 big capacitors and then later I stepped up to 8 of those big capacitors. I fried the old SCR and then replaced it with an ED431825 that can handle 1.8 KV (1800 Volts) and 250 amps continuous and 6.5 KA peak (6500 Amps). This design started out with one MOT (Microwave Oven Transformer) then for a while it had two MOT's.


At some point I added the flat Coil shown below. It was wound a few turns at a time then those turns were glued down and the next few turns were added. A rotating stick held the wire down while the glue was drying. The glue was of a flexible kind. At some point the wood was shattered into pieces, so it was replaced with Plexiglas. That was a bad idea. The Plexiglas shattered on the first test launch.

I am upgrading the 8 capacitor 800 volt model to now operate with up to 1600 volts. All of the capacitors had to be turned 90 degrees so that they can be connected in series instead of parallel. Here is the preliminary schematic, it is missing the 10 amp fuse, and that is a 1 meg resistor to the voltmeter that is located on the front panel.


There were two problems with the first test run of the new design. The 10 amp fuse blew because it now draws more current than that. I replaced it with a 15 amp fuse. The next problem is that the meter pegs. I was using a digital volt meter as well and it was not supposed to exceed 600 volts but it survived at 1200 volts. As far as the can crushing goes it did not crush it much more than the 800 volt model had crushed it.

Before testing it a second time I changed the resistor to the meter to 2.5 meg. The meter now reads 2.5 KV full scale. I also shortened the wire to the coil to 1/2 of the original length. The next test was at 1.6 KV and it resulted in the flattest soda can yet. The video is being
uploaded to YouTube.

Monday, December 15, 2008

LED Sign

A few years ago a relative, Ernie I think, gave me a sign that someone was throwing out. It was large and had a car repair place advertisement. Well I removed the guts, got it working, reprogrammed it and put it in my own cabinet. The problem now is that it is too big to fit in the window.


As I was testing it out our cat Bling or as I call him stinky, decided to attack the sign. He normally attacks my laptop computer screen climbing on the keyboard as he does it.

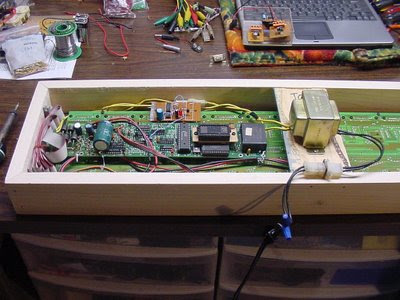
I had to rearrange the guts to make the sign smaller. I moved the logic board to be behind the sign board. The transformer did not fit so I put that on the back side. The brown board has a 555 and a 4017 that resets the sign after 20 seconds so the car advertisement does not come up like it used to.


Tuesday, December 9, 2008

Home Made Dual Screen Monitor Base

Recently I had an EBay deal that I just could not refuse. They were selling 17 inch LCD monitors for $44 each without the stand. With shipping they were about $60 each and they arrived not working. It turns out that the unnamed shipping company shook them so bad as to unsolder capacitors in the power supply. So after some minor repairs they worked. the next problem was what to use for a stand. They do not make dual stands that I know of and most stands cost more than I paid for the monitors.

Here is the solution. First a 1 by 6 connects the two monitors together. Drill 4 holes at each end of the 1 by 6 that line up with the mounting holes in the back of the monitors. Then I used some 2 by 3's about 1 foot long to a 2 by 6 base that is 2 foot long. The tops of the 2 by 3's were notched so that they are under as well as behind the 1 by 6 that connects the 2 monitors. I used a high quality 2 by 6 for the base since it can be seen. That one board cost me $8, the rest of the boards were all off the scrap pile.